Generally it is not secure to allow remote root login. Additionally, using Password Authentication is also insecure. So… after setting up my server at RackSpace, the next step was to setup basic SSH login security.
I’ve had great success using RackSpace Cloud Servers, they are easy to setup and use (like this one, most of my linux based guides will use a Rackspace Cloud Server as a starting point). I will assume you have your server started and you are ready to begin at the command prompt. This guide uses an Ubuntu 10.04 LucidLynx LTS install, but these steps will work on most other Linux distributions.
Securing SSH Login
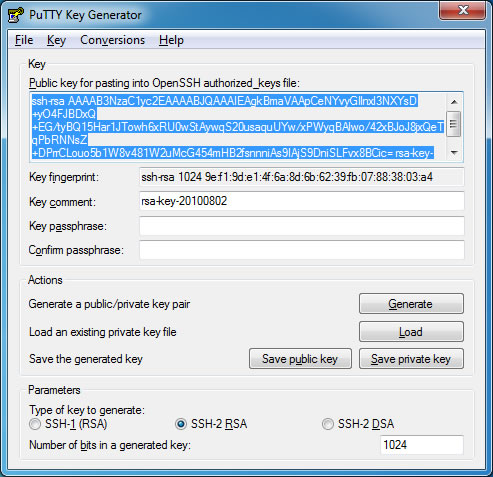
We will be using Public Key Authentication, so our first step will be to generate a public and private key. I recommend using PuTTYgen.
- Open PuTTYgen and click the “Generate” button
- Move your mouse (PuTTYgen uses random mouse movement to generate a public and private key)
- Enter in a “Key Comment” (this text will appear each time you login via SSH, something like “Authenticating with public key: YOUR KEY COMMENTS”)
- Keep the PuTTYgen window open…
Before we get ahead of ourselves, we will need to create a new user account:
useradd -s /bin/bash -m yourname
We will also add this user to the sudoers list, open up the sudoers file with the following:
visudo
Now find and change the following line…
root ALL=(ALL) ALL
to…
root ALL=(ALL) ALL
yourname ALL=(ALL) NOPASSWD: ALL
Save the file by: pressing CTRL+X then typing “y” and pressing RETURN … or similar depending on the editor used.
The above gives the yourname user all sudo privileges and will also not require the user to enter a password each time they try to use a privileged command.
If you’re working in a public space, you may want to always be prompted for a password when you use sudo. To do this, just remove NOPASSWD:. Remember, you must also set a password for the yourname user account with the following command:
passwd yourname
Create a .ssh directory in the yourname user home directory (this is where the authorized_keys file will be stored).
mkdir /home/yourname/.ssh
At this point, we will be using vim to create/add the public key to the authorized_keys file, so here is a quick primer on using vim.
Now you must create the authorized_keys file:
vim /home/yourname/.ssh/authorized_keys
Enter editing mode and copy the public key from the PuTTYgen window and paste it into the open authorized_keys file in vim. Save and exit the file.

Tip: the authorized_keys file format is that of one public key per line for each user. Below is a sample file, note the ssh-rsa prefix followed by a space and then the public key (all on a single line, no line breaks). Additionally note the comments prefixed with #.
# user: john
ssh-rsa AAAAB3NzaC1yc2EAAAABIwAAAIEAsyQ/ZOQqivsRbZze6bn3P63ZmlqiKD8sL/eqayqG9Mg5iONT/7F8ZX5XmOdDSoSNtlSeuHNgUo+ePenoQ/3w3gZqL922Dmqvi/XclTUh0rde82QBKz4GtnIUQO8Z4XHAya3ZNHW9DAQm8s7LXW/sObkNyqlFf0pz/MIsHKj8xmE=

# user: davidrussell
ssh-rsa AAAAB3NzaC1yc2EAAAABIwAAAIEApwFQWa9G0FX7M+uSi8ipny0+C14lPFZtdFLj2rT5FNbUcat6BNswFt4Ys97celZ1HiuMGjyAIPDO1B290SSXGOWV/hwhNlMG080yjXbj0BC/5qNim9eDXJHqq0knFbIsHvcOZ9SepVp9q6SuqXuSQ6AXmMed3ZRm2ig7DiqDHVM=
Lets finish up using PuTTYgen by clicking the “Save Private Key” button, for added security you may choose to add a password to the private key (in addition to the secure login with your private key file, you will also be prompt for your private key password). We are done with PuTTYgen.
Now for the finishing touch, we need to edit the /etc/ssh/sshd_config file:
vim /etc/ssh/sshd_config
First, a good security tip is to change the standard SSH listening port from 22 to something else [xxxx]. To do this find the following line:
Port 22
And change it to (xxxx being the port number) …
Port xxxx
Second, confirm that the following lines are set to “yes”…
RSAAuthentication yes
PubkeyAuthentication yes
Before adjusting the following lines, you may want to skip to Testing Your Login and test that the Public Key Authentication works properly, before you disable root login and Password Authentication.
Now, find the following lines…
PermitRootLogin yes
PasswordAuthentication yes
and add/change them to…
PermitRootLogin no
PasswordAuthentication no
Testing Your Login
For all your settings to take effect you must restart ssh:
/etc/init.d/ssh restart
Now, logout and then login … remember you will now need to use your private key when logging in with SSH (I am use PuTTY) To set your private key with PuTTY, in the Category options tree, select: Connection > SSH > Auth … use the “Browse” button and select the private.ppk you saved from PuTTYgen.
Now try to login with the yourname user account, you should be presented with a message similar to: “Authenticating with public key: YOUR KEY COMMENTS”.
If you’ve setup a password for your private key, then you will be prompted to use it during login.
it works! great tip, thanks for sharing!
hey this is great! one other thing i like to do is to move the sshd service from port 22 to something non standard. this helps to keep the automated bot hacks to a minimun or nil, and provides one more line of defense. : )
adjust the port at the top of the same sshd_config file, then restart the service.
@mac geek, thanks for the tip, I’ve started using your suggestion and have also added it to the tutorial.
The ssh restart line is incorrect. It is the daemon that needs restarting, so…
/etc/init.d/sshd restart
I would like to recommend to use Two Factor SSH with Google Authenticator (http://digitaljournal.sg/wp/?p=146)
to tighten up the sshd security
Thanks for great tutorial.
To restart sshd do ‘service sshd restart’ works but i am sitting on a RH distro i dont know about ubuntu
Amazing tip!! Thanks a lot for sharing the step-by-step tutorial 🙂
(had to use service sshd restart instead)
Hi,
thanks for tutorial – just two questions:
1) Is it possible to use both at the same time – password and authentication using public key?
does it suffice to keep this one to yes?
PasswordAuthentication yes
2) How to disable a previously added public key? Is all I need to do just this:
# user: davidrussell
#ssh-rsa AAAAB3NzaC1yc2EAAAABIwAAAIEApwFQWa9G0FX7M+uSi8ipny0+C14lPFZtdFLj2rT5FNbUcat6BNswFt4Ys97celZ1HiuMGjyAIPDO1B290SSXGOWV/hwhNlMG080yjXbj0BC/5qNim9eDXJHqq0knFbIsHvcOZ9SepVp9q6SuqXuSQ6AXmMed3ZRm2ig7DiqDHVM=
# – basically simply commenting out one of the keys and doing restart of the ssh server? Or is there any other action required? Thanks!
1) I am not sure .. give it a try and report back if it does indeed work
2) yes you can comment out the key or delete it completely
Also check this url:
http://www.itsecuritycenter.com/linux-security-secure-ssh-configuration.html
In the testing of your new credentials section. You don’t need to log out nad log in.
I start a new Putty session and go that way. That means if I have made a mistake I am still logged in via the original putty shell and can hopefully correct it.
One other tip to add to your awesome step by step.:
change IP tables to stop brute force attacking:
after three missed attempts in a minute locks it out for a minute. trusted address is white-listed from this check. change port 22 to the new port you have used.
iptables -N SSH_WHITELIST
iptables -A SSH_WHITELIST -s -m recent –remove –name SSH -j ACCEPT
iptables -A INPUT -p tcp –dport 22 -m state –state NEW -m recent –set \
–name SSH
iptables -A INPUT -p tcp –dport 22 -m state –state NEW -j SSH_WHITELIST
iptables -A INPUT -p tcp –dport 22 -m state –state NEW -m recent –update \
–seconds 60 –hitcount 4 –rttl –name SSH -j ULOG –ulog-prefix SSH_brute_force
iptables -A INPUT -p tcp –dport 22 -m state –state NEW -m recent –update \
–seconds 60 –hitcount 4 –rttl –name SSH -j DROP
Alternatively fail2ban is meant to do the above but be excellent.